March 2020
Some time ago the process of changing the admin email in the self-hosted version of
WordPress was made more secure by requiring the change to be validated by following
a link sent via e-mail. This helps ensures the entered e-mail is valid. The problem
arises when, for various reasons beyond one's control, the validation email fails
to reach its destination. It then appears to be impossible to properly change the
site's admin email.
Fortunately, there is a work around method available to most
people who have access
the site's hosting account. Before talking about that, if you are currently trying
to solve this problem, be sure to check your email account's spam folder for the
missing message. Server generated email often lands in spam folders despite us taking
measures to prevent it.
The work around method makes use of the phpMyAdmin app that lets
you directly manipulate
the database (DB). It's usually accessed through your hosting account. If you have a
localhost installation that doesn't even send out email, this is an important method
to learn. You should be able to access localhost phpMyAdmin through the control panel
you use to start up the MySQL server.
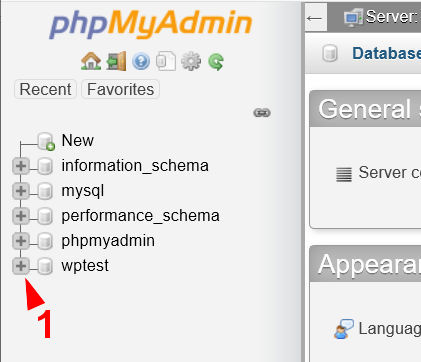
Once you enter phpMyAdmin, identify the correct database in the left sidebar. If you
are not sure which is correct, the database name is defined in your wp-config.php
file for WordPress. Expand the DB entry to see all the tables in the database
(#1 above).
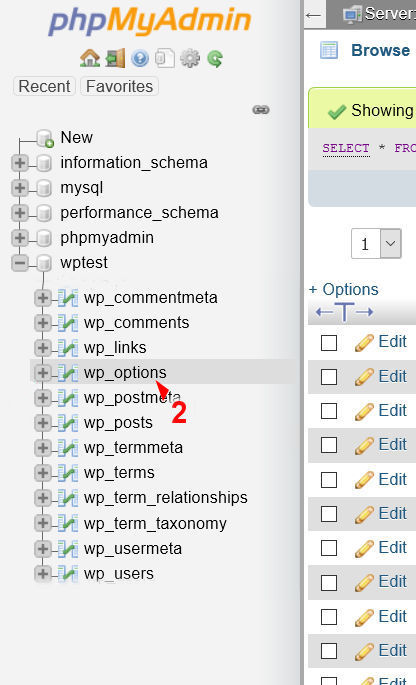
Click on the options table (#2 below). The full table name by default is
"wp_options", but
the "wp_" prefix can be altered in the wp-config.php file.
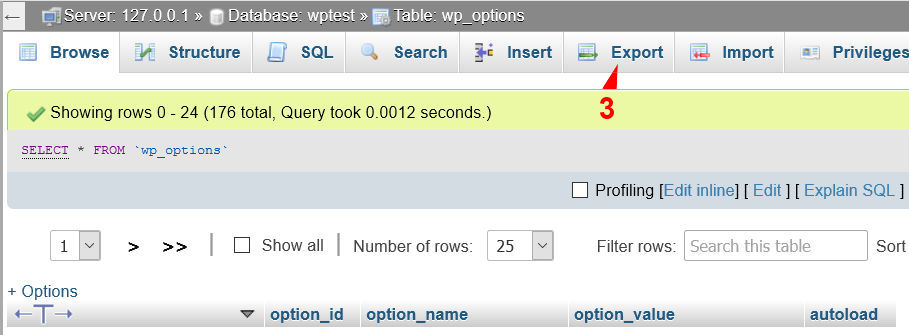
Before you go and make changes with phpMyAdmin, you should make a backup of the table
or even the entire DB. To backup the table, go to the Export tab
(#3 below). The default
settings should be OK, just click "Go" and save the backup file in a safe place.
If you feel like making a full backup (always a good idea), click on the database name,
then use that Export tab there instead of the table export.
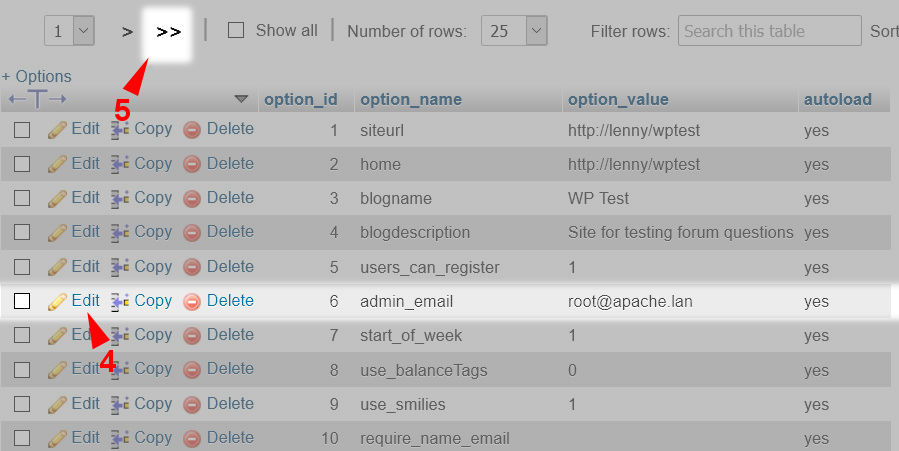
After clicking on the options table, a list of options will be shown in the main area.
Near the top of the list should be the option name "admin_email".
Click the "Edit"
link to the left (#4 below). Alter the email address as desired, then click
the "Go" button
at the bottom. Ta-da! The admin email address has been changed.
But wait! We're not done yet. WordPress is still going to display a message about
validating the pending change through the link sent via email. You could simply ignore
it, but it's annoying, we need to get rid of that too. At the top and bottom of the
options list is a ">>" link (#5 above) that will
take you to the last page of the options
list. If you recently tried and failed to change the email within WordPress, the
other options we need are likely on the last page. The option names are
"adminhash"
and "new_admin_email". If you do not see them on the last page,
browse backwards or
use the Search tab to locate them. When found, simply delete the entire row of each
of the named records.
That's all, email changed and nag message gone! Note that WordPress displays the
"... new address will not become active until confirmed. " message all the time no
matter what the status of the email is. It is the "There is a pending change of the
admin email ..." nag message we wish to get rid of in this exercise.


 Before you go and make changes with phpMyAdmin, you should make a backup of the table
or even the entire DB. To backup the table, go to the Export tab
(#3 below). The default
settings should be OK, just click "Go" and save the backup file in a safe place.
If you feel like making a full backup (always a good idea), click on the database name,
then use that Export tab there instead of the table export.
Before you go and make changes with phpMyAdmin, you should make a backup of the table
or even the entire DB. To backup the table, go to the Export tab
(#3 below). The default
settings should be OK, just click "Go" and save the backup file in a safe place.
If you feel like making a full backup (always a good idea), click on the database name,
then use that Export tab there instead of the table export.